Solutions for Common Questions
Please remember to check this webpage should you encounter any unusual random errors or problems that don't seem to be related to the standard forest description data.
The following errors, messages and behaviour are all caused by corruption of the Access Database Engine. The solution is to follow the instructions provided to reinstall the Access Database Engine.
-
There are no wood flows in the interface charts or the Excel reporting schedules.
-
The worksheet 'Croptype' does not exist. This is a mandatory worksheet.
-
The worksheet '[......]' does not exist. This is a mandatory worksheet.
-
Critical Error 'Object reference not set to an instance of an object.'
-
Critical Error Importing Forest Description. 'The directory name is invalid'.
-
The user interface intermittently and randomly crashes and closes.
The following entries cover solutions to common problems that users have encountered.
-
Waiting until Sentinel LDK Run-Time Environment is available
-
This program is blocked by group policy. Contact your system administrator.
-
The macro buttons and button text expand randomly when clicked
-
Unable to cast COM object of type 'Microsoft.Office.Interop.Excel.ApplicationClass'
-
Fatal Non-UI Error. Could not write the error to the event log.
-
#NUM! errors in the Microsoft Excel reporting template pivot tables
-
Clicking the macro button to 'Update Data' produces a mirror of the button below
-
Clicking the macro button to 'Update Data' produces SQL Server Connection Error
-
Unable to apply SYSADMIN permissions to the local instance of SQL Server Express
The Worksheet 'Croptype' Does Not Exist

The error "The worksheet 'Croptype' does not exist. This is a mandatory worksheet." will occur if the user opens the forest description workbook while it is being imported. Please close the forest description workbook and keep it closed when importing.
However, if the forest description workbook was not opened during the import process, the error will likely arise because of two possible reasons:
-
Microsoft Office Updates for all versions of Microsoft Office can corrupt existing installations of the Microsoft Access Database Engine, or;
-
Microsoft Excel was changed from a 32-bit to 64-bit installation (or 64-bit to 32-bit) after the Tigermoth software interface was originally installed.
If the software is no longer reporting wood flows in either the charts or the reporting schedules then the Microsoft Access Database Engine has almost certainly been corrupted.
Microsoft has recently provided information on how to workaround the corruption of the Microsoft Access Database Engine caused by ongoing Microsoft Office Updates. The latest Long Term Release (LTR) of the software interface has this fix included. To avoid the errors outlined above then all users should follow the instructions at the link below.
Reinstall the Tigermoth Software Interface
The 'Update Data' Macro Button Won't Work
All versions of Microsoft Excel both 32-bit and 64-bit may experience a lack of functionality associated with buttons and links that run macros within Excel workbooks after recent Microsoft Office Updates. The problem still exists as at January 2020, and can reoccur with subsequent official Microsoft Office Updates.
If you cannot "click" the buttons on the standard reporting templates then it is likely that you need to follow the steps below to reset the macro functionality in your version of Microsoft Excel.
STEP 1 - OPEN WINDOWS FILE EXPLORER AT %LOCALAPPDATA%
To reset your macro functionality, find and delete all versions of the file called MSFORMS.EXD that reside in your user profile. After Microsoft Office updates this file can develop an unexplained incompatibility.
Close all applications that may be open including all Office and Excel files as well as Microsoft Outlook. Then open Windows File Explorer and in the file path command line type %LOCALAPPDATA% (as shown below) and press Enter.

STEP 2 - FIND AND DELETE THE EXISTING VERSIONS OF MSFORMS.EXD
You should now be in a directory similar to C:\Users[…username…]\AppData\Local. Type MSFORMS.EXD in the search box and press Enter. Highlight all the files called MSFORMS.EXD that are found by the search and press Delete.
Open a reporting template in Excel and check that the macro buttons are now functioning.

Could Not Determine License Manager Version
When using the Software Licensing app to create a new C2V file and the error Could not determine the version of the License Manager occurs, the Sentinel License Manager service has probably unexpectedly stopped or has not been set to start automatically.
The error would normally appear as shown below.
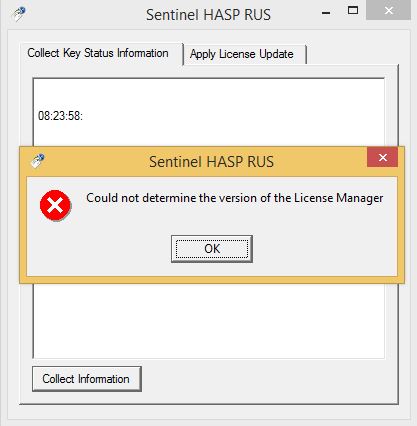
Follow the instructions at the link below to fix this error.
Restart the Sentinel License Manager service
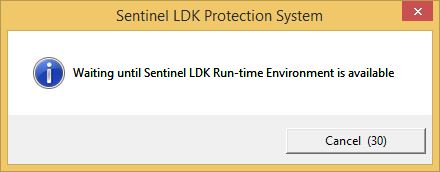
Waiting Until Sentinel LDK Run-Time Available
The software is required to incorporate the Sentinel LDK Protection System as part of agreements with third-party supplies of libraries and object code.
If the error Waiting until Sentinel LDK Run-Time Environment is available arises (shown below) when the Tigermoth software is started then there are three possible reasons.
- The Software is not currently licensed, or;
- The Sentinel License Manager service is not currently running, or;
- Windows has been updated and the Sentinel License Manager was deactivated.
To determine what the problem could be, then make a new C2V Licensing file using the Tigermoth Licensing application. If a new C2V Licensing file can be made without an error being generated then the Software is not currently licensed and the C2V and V2C Licensing files need to be exchanged. Follow the instructions at the link below to license the software.
Request a Software Licensing File
If an error is generated when a C2V Licensing file is made then make note of what the error is and compared it to the two possible errors shown below.
Error: Could Not Determine License Manager Version
This error occurs when the Sentinel License Manager service has unexpectedly stopped or has not been set to start automatically. Follow the instructions at the link below to fix this error.
Restart the Sentinel License Manager service
Error: Could Not Access HASP Key - Key With Specified ID Was Not Found

This error confirms that deactivation of the Sentinel License Manager service and its drivers has occurred. Follow the instructions at the link below to fix this error.
Activate the Sentinel License Manager after a Windows Update
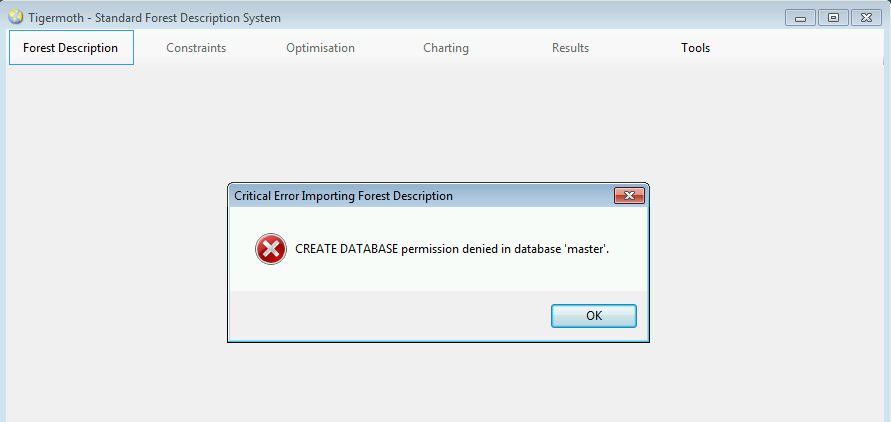
CREATE DATABASE Permission Denied
This error is most likely to occur when the end-user does not have administrator rights on their local machine and SQL Server Express was set up without giving all end users of the machine either dbcreator or sysadmin server roles. All users of the software need to be able to create and delete databases from the underlying SQL Server instance.
All users therefore need to be assigned the Server Role of 'dbcreator' at a minimum.
It is common practice when using a local instance of Microsoft SQL Server Express to give all end users of the machine full sysadmin rights on the local instance as this is local to their machine and not for use across the Enterprise.
If a user has not been assigned either of these two SQL Server Roles then the error shown below will occur. To assign the correct Server Roles to end users then follow the steps outlined below.
STEP 1 - OPEN A WINDOWS COMMAND PROMPT AS AN ADMINISTRATOR
To apply these roles to all users of the local SQL Server Express instance open a Windows Command Prompt with local Administrator rights. The system will ask for a local Administrator user name and password if your standard user name does not have local Administrator rights.
To open a Command Prompt with local Administrator rights click on the Windows Search icon at the bottom left of the Windows Desktop. Then type CMD in the search bar. This will then show the Command Prompt app. Select the option titled Run as Administrator as shown below.

STEP 2 - USE SQLCMD TO GIVE USERS THE SYSADMIN SERVER ROLE
Normally the SQL Server Express instance will be called either SQLEXPRESS or TIGERMOTH. The correct instance would have been selected when the Tigermoth software was first started. It can be selected again from the software menu Tools/Setup.
Type one of the two following commands (depending on the SQL Server instance name) and press Enter. Note that the 'dot' before the forward slash is required.
SQLCMD -S .\SQLEXPRESS -E
or
SQLCMD -S .\TIGERMOTH -E
If the name of the local SQL Server Express instance is different, use that name in this command. If the instance named is not correct then an error will result, so try again with the correct name.
If the instance named is correct then the command prompt 1> will be shown. Type the commands shown below and press Enter after each.
USE master
GO
EXEC sp_addsrvrolemember 'BUILTIN\Users', 'sysadmin';
GO
These are shown in the screenshot below and after these commands have been successfully entered the original CREATE DATABASE Permission Denied error should no longer occur.

STEP 3 - SHOW ALL USERS WITH THE SYSADMIN SERVER ROLE
A list of all users that have been assigned the sysadmin role can be show using the following commands. Connect to the local SQL Server Express instance as per Step 2 above and then type the SQL commands shown below and press Enter after each. It is possible to copy all the commands and paste in a single operation.
USE master
GO
SELECT name,type_desc,is_disabled, create_date
FROM master.sys.server_principals
WHERE IS_SRVROLEMEMBER ('sysadmin',name) = 1
ORDER BY name
GO
The users that have sysadmin permissions on the connected SQL Server instance are listed as shown in the example below.

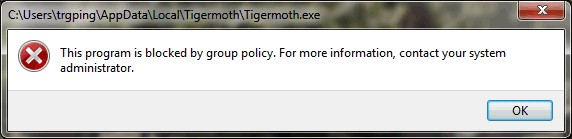
This Program is Blocked by Group Policy
There may be times when the software is blocked from operating in its default installation directory. The default installation directory is the system variable %LOCALAPPDATA%.
Normally users are free to access this location for their applications and data, however in some situations a Group Policy may be in place that prevents apps from running at this location.
The error below is typical of the message shown when a group policy is preventing a component of the software from operating correctly. This error can occur when either the Licensing application is used, the main software application is started after a change in policy, or in some circumstances when the software is uninstalled.
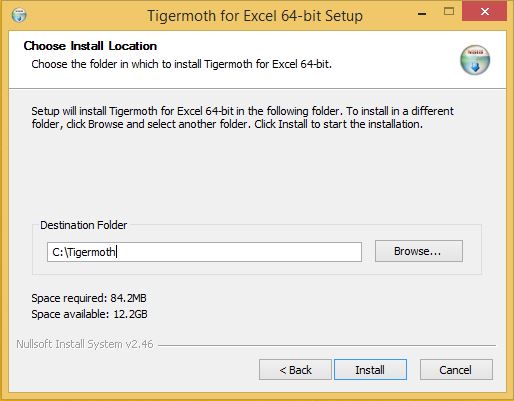
If this error occurs when using any component of the software then a simple reinstall of the software interface to an alternative directory is all that is required. Follow the steps outlined below to install the software to an alternative directory.
STEP 1 - DOWNLOAD THE USER INTERFACE
If you haven't done so already, download the Software Interface from the link that was sent in response to the original emailed Software Interface request.
STEP 2 - INSTALL THE USER INTERFACE IN AN ALTERNATIVE DIRECTORY
Close any existing Tigermoth windows that may be open. Do not run the user interface uninstall application as this is likely to be prohibited by the group policy that is in place on the local machine.
Double click the user interface installation file. Click 'Next' to proceed to the option to 'Choose Install Location'. Enter the alternative directory for the software installation, commonly C:\Tigermoth\35 or browse to an existing installation directory as shown below.
Click 'Install' to complete the user interface installation.
There is no need to reinstall or uninstall the Tigermoth Runtime Environment (RTE). This component is not impacted by group policies on the local machine because it is installed with full administrator rights. Only the user interface needs to be reinstalled if a group policy renders the default installation location unworkable.
The Macro Buttons and Button Text Expand When Clicked
All versions of Microsoft Excel both 32-bit and 64-bit may experience strange resizing of the buttons and button text that run macros within Excel workbooks after a Microsoft Office Update. If you "click" the buttons on the standard reporting templates and the button size expands or the button text expands, and the buttons lose their functionality, you can follow the steps below to reset the correct functionality of the buttons in your version of Microsoft Excel.
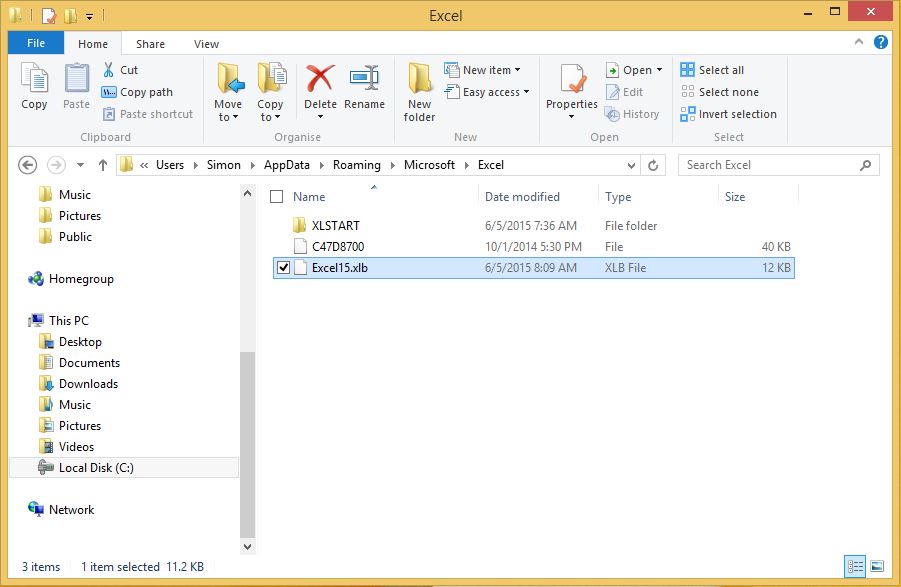
STEP 1 - OPEN WINDOWS FILE EXPLORER AT %APPDATA%\Microsoft\Excel
Close all applications that may be open including all Office and Excel files as well as Microsoft Outlook. Then open Windows File Explorer and in the file path command line type %APPDATA%\Microsoft\Excel (as shown below) and press ‘Enter’.

STEP 2 - DELETE THE EXISTING FILE CALLED EXCEL15.XLB
You should now be in a directory similar to ‘C:\Users[…username…]\AppData\Roaming\Microsoft\Excel’. There should be a file called 'Excel15.xlb' (for Excel 2013), 'Excel14.xlb' (for Excel 2010) or 'Excel12.xlb' (for Excel 2007). Delete this file. Open a new reporting template in Excel and check that the macro buttons are now functioning as they should without randomly expanding.
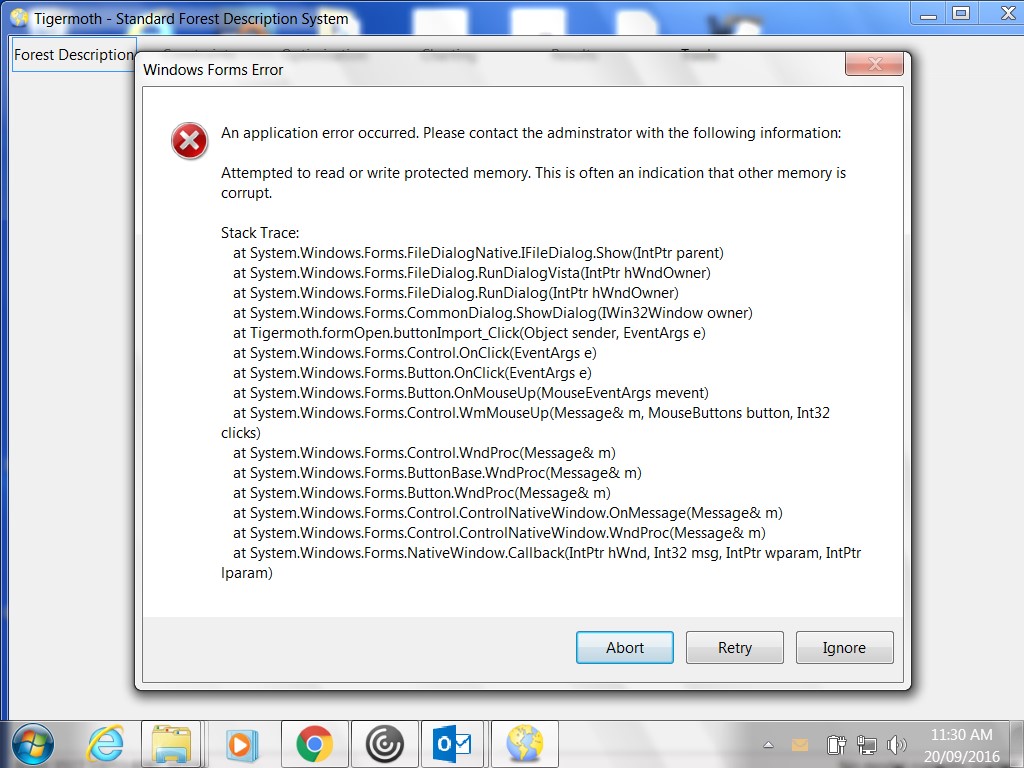
'Attempted to Read or Write Protected Memory' Error
This error occurs when anti-virus software is preventing the software application from opening a File Open dialog box. If the software was working correctly, but then this error occurs whenever the Import Forest Description button is pressed, then the anti-virus software on the machine is now preventing the software from operating correctly.
This normally occurs when enterprise anti-virus software is upgraded and its compatibility with the software has not been tested.
The workaround is to set the anti-virus software to white-list (ignore and treat as safe) the files that are present in the installation directory of the software. White-listing the entire installation directory of the software by default is recommended so that future software updates don't also get quarantined by the anti-virus software.
If the problem persists then uninstalling the software and reinstalling to a simple directory such as C:\TIGERMOTH and then permanently white-listing this directory may be the best option.
Unable to cast COM object of type 'Microsoft.Office.Interop'
This error seems to occur when Microsoft Office has somehow become corrupted or unstable and needs to be repaired using its built in repair functions. The most common type of error is shown below and normally only presents when using the Parallel Import routines for loading the forest description. Two different versions of the same error are shown below. Sometimes the error can also read '[threadSheetRegime]: The remote procedure call failed.' (as an example). To fix this error carefully follow the two steps below.
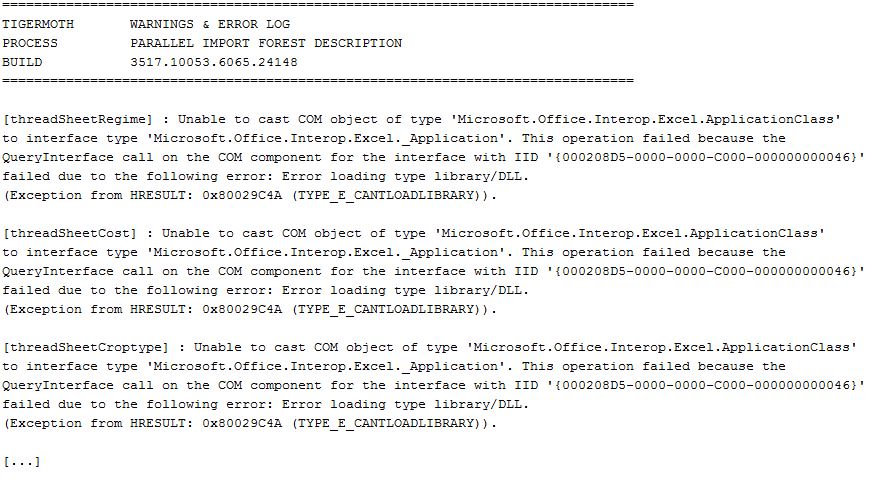

In some situations the error can also be reported as 'Fatal Non-UI Error. Could not write the error to the event log.' There will be multiple windows with the error generated as the connection to Microsoft Excel fails. To fix this error carefully follow the two steps below.

STEP 1 - OPEN WINDOWS PROGRAMS AND FEATURES
To open Windows Programs and Features, click on the Windows Search icon at the bottom left of the Windows Desktop. Then type appwiz.cpl in the search bar. This will then show the App Wizard Control Panel item. Select the option titled Run as Administrator as shown below.

Select the entry for Microsoft Office Professional and then click the button Change as below.
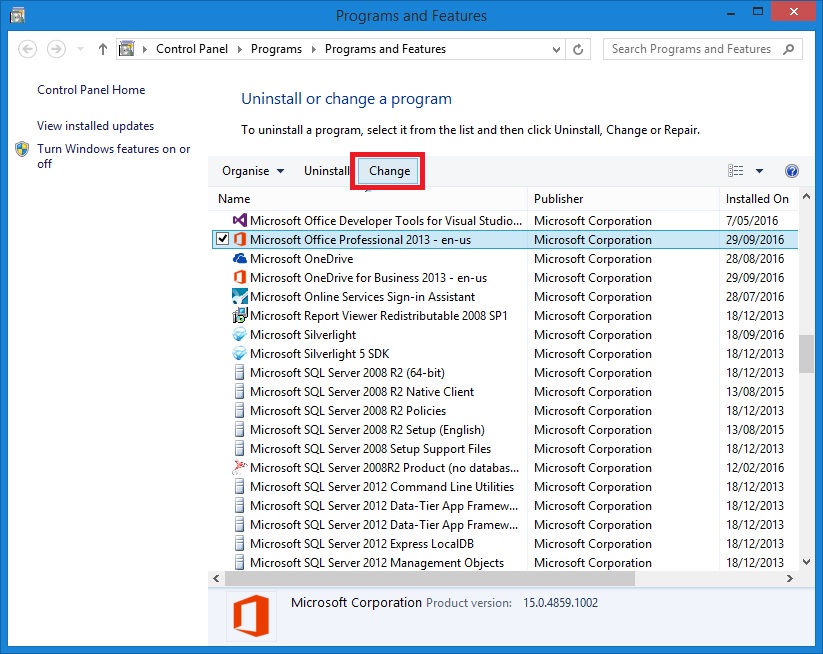
STEP 2 - UNDERTAKE A 'QUICK REPAIR' OF MICROSOFT OFFICE
After clicking the Change button then an option for repairing Microsoft Office should open. Select the Quick Repair option and the press the button Repair as shown below. DO NOT select the Online Repair option.

DO NOT SELECT THE 'ONLINE REPAIR' OPTION
Do not select the 'Online Repair' option. Selecting this option will completely uninstall Microsoft Office and download and reinstall the software. This is not necessary. The 'Quick Repair' option should rectify the error that was preventing the software from working.
Parallel Import Error 'Exception from HRESULT: 0x800A03EC'
If an Exception from HRESULT: 0x800A03EC error occurs (shown below) when importing a Standard Forest Description using the parallel import routines, then close the software and close all instances of Microsoft Excel.
Open the Standard Forest Description workbook that gave the error and save it again with a new filename making sure to use the *.XLSB Binary Format for the new Excel workbook.
it is important to open and save the workbook with a new name. Try importing the Standard Forest Description again to overcome the error below.

#NUM! Errors in the Excel Template Pivot Tables
The March 27, 2018 update for Excel 2016 to Version 1803 (Build 9126.2116) and the April 11, 2018 update for Excel 2016 to Version 1803 (Build 9126.2152) are returning #NUM! errors instead of 0s (zeros) in the pivot tables of the reporting templates (example below). This error has been reported to Microsoft for their attention, but there is currently not a fix for these versions of Excel 2016 if these types of #NUM! errors appear in pivot tables linked to external data sources.
The error is affecting both 32-bit and 64-bit versions of Excel 2016 Version 1803 (Build 9126.2116) and Version 1803 (Build 9126.2152). The latest releases of both Excel 2013, and Excel 2010 are not affected by this error.

Currently (as at 17 May 2018) the only solution is to revert to the previous version of Excel 2016 that was released on March 13, 2018 and is listed as being Excel 2016 Version 1802 (Build 9029.2253). The following instructions show how to revert to this version of Excel and avoid #NUM! errors being return from external data sources.
STEP 1 - VERIFY YOUR VERSION OF EXCEL 2016 BEFORE PROCEEDING
Open a new blank ‘Excel’ workbook and then click ‘File’ at the top left, then click ‘Account’. On the right-hand side 'About Excel' will show the current version and build details. If you are running Microsoft Office 365 ProPlus then the version and build information will be towards the top, under the Subscription Product heading.
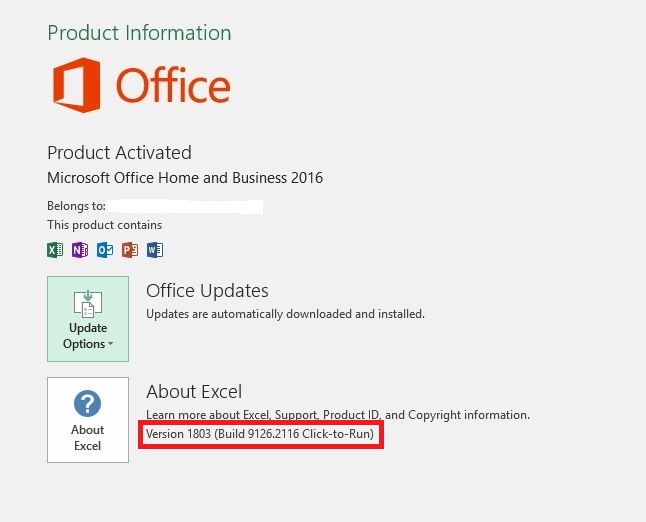
If your version and build of Excel 2016 is listed below then your installed version of Microsoft Excel 2016 will produce #NUM! errors when returning external data to Excel pivot tables.
- Excel 2016 Version 1803 Build 9126.2116
- Excel 2016 Version 1803 Build 9126.2152
- Excel 2016 Version 1804 Build 9226.2114
- Excel 2016 Version 1804 Build 9226.2126
If you are running these combinations of Excel 2016 versions and builds of then you should proceed with Steps 2 to 4.
If you are not running these versions of Excel 2016 or you are running Excel 2013 or Excel 2010 then DO NOT proceed with the instructions below - only the versions and builds listed above of Microsoft Excel 2016 will return #NUM! errors from external data sources.
IMPORTANT
Only proceed with Steps 2 to 4 if your are running Excel 2016 and you version and build of Excel 2016 is listed above. Steps 2 to 4 SHOULD NOT be undertaken if you are running Excel 2013 or Excel 2010.
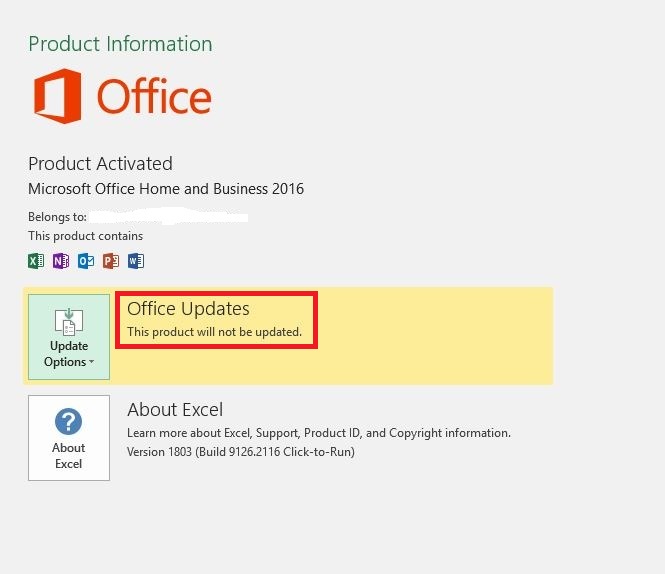
STEP 2 - TURN OFF AUTOMATIC UPDATES FOR MICROSOFT EXCEL Click the 'Update Options' button and select the 'Disable Updates' option. This is important because it allows a previous version of Excel 2016 to be installed and remain in place without being automatically updated.

After 'Disable Updates' has been selected then the 'Office Updates' section should say 'This product will not be updated.' as shown below.
STEP 3 - REVERT TO EXCEL 2016 VERSION 1802 BUILD 9029.2253
Open a Windows PowerShell (Admin) window by right clicking the Windows Start button at the bottom left hand side and selecting Windows PowerShell (Admin) as shown below.

Issue the following commands at the PowerShell prompt. Each command can be copied and pasted from the text below.
CMD
CD %PROGRAMFILES%\Common Files\Microsoft Shared\ClickToRun
OfficeC2RClient.exe /update user updatetoversion=16.0.9029.2253

After the final command is entered, Microsoft Office will enter update mode and proceed to download and install the March 13, 2018 release of Office version 1802 (Build 9029.2253). This will download about 800MB of data and needs to be left to download and install. When the process is complete the 'Office' download window will close without notification. It is advisable to reboot the PC after the download has completed and Office has been installed.

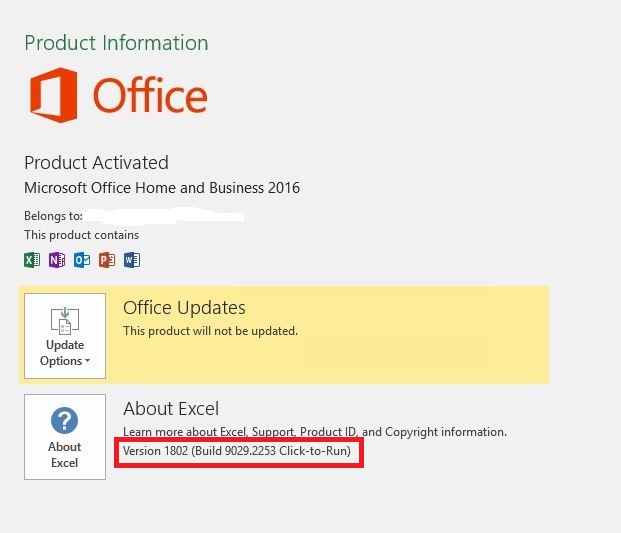
STEP 4 - VERIFY THAT EXCEL 2016 IS VERSION 1802 BUILD 9029.2253
Open a new blank ‘Excel’ workbook and then click ‘File’ at the top left, then click ‘Account’. On the right-hand side 'About Excel' will show the current version and build details. You should now be running Version 1802 Build 9029.2253 which is the March 13, 2018 release.
Clicking the 'Update Data' Button Shows Duplicate Button
All versions of Microsoft Excel both 32-bit and 64-bit may experience a lack of functionality associated with buttons and links that run macros within Excel workbooks after recent Microsoft Office Updates. If you "click" the buttons on the standard reporting templates and instead of working correctly the button is simply duplicated/mirrored below the button that was clicked then the steps below need to undertaken. An example of the 'Update Data' button being duplicated is shown below.

STEP 1 - CHANGE DISPLAY SCALE FACTOR TO 100%
In the Windows 10 'Settings' interface, select 'System' and then select 'Display'. Under the option called 'Scale and Layout' then make sure that the size of text, apps and other items is set to 100%. Once this item is set to 100% open the Workbook and try to click one of the macros buttons. If the problem still persists then move to Step 2 below.
STEP 2 - OPEN THE WORKBOOK AND PRESS ALT + F11 TO OPEN VBA
Open the workbook that is having the problem and press ALT + F11 to open the VBA Module interface. Then click the 'Design Mode' button as shown below. This will enable the selection (as opposed to the clicking) of the macro buttons on the templates 'Summary' worksheet.

STEP 3 - SELECT EACH BUTTON AND MOVE IT SLIGHTLY SIDE-TO-SIDE
Go to the Summary worksheet of the Workbook and then click each Command Button to highlight it, and then using your mouse move it slightly left and right. Do this to each of the three buttons.
Press ALT + F11 to open the VBA module again, and then click the Design Mode button again to disengage it. Then close the VBA module Window.
The macro buttons should now work correctly again.
Clicking the 'Update Data' Button Shows SQL Connection Error
If you "click" the 'Update Data' button on the standard reporting templates and instead of working correctly an error is generated that says 'SQL Server Connection Error' as shown below, then it is likely that the template that is being used is old and needs to have the VBA code embedded in the template updated. To update the VBA in the template then the steps below need to undertaken.

STEP 1 - SAVE THE EXCEL TEMPLATE ON THE LOCAL DRIVE WITH A NEW FILE NAME
Save the Microsoft Excel template that is not working to a directory on the local C Drive with a new name. This is simply needed so that you are using a fresh copy of the template and you are not overwriting the only copy of the existing template. Normally older templates may be highly customised, so it is safer to make a copy of the template and then update the copy to preserve the original version of the workbook template.
STEP 2 - OPEN THE TIGERMOTH INTERFACE AND CLICK MENU ITEM TOOLS/UPDATE VBA
Open the Tigermoth interface and then click the menu item 'TOOLS' and then 'UPDATE VBA'. A Windows file navigation menu will appear. Navigate to the copy of the Excel template you made in Step 1 and select this and click the 'Open' button to update the VBA code in the workbook.

STEP 3 - OPEN THE UPDATED TEMPLATE AND TRY TO IMPORT NEW DATA
Open the template that has just been updated and try to import new data using the 'Update Data' button as normal. The updated VBA should now work and an error should not be generated.
Unable to apply SYSADMIN permissions to the local instance of SQL Server Express
If the end-user does not have administrator rights on their local machine and SQL Server Express was set up without giving all end users of the machine either 'dbcreator' or 'sysadmin' permissions then a database error will occur. All users of the software need to be able to create and delete databases from the underlying SQL Server instance.
If these end user rights cannot be assigned then select the default 'LOCALDB' instance to use as the database server. Click 'TOOLS' and then 'SETUP' and then select the 'MSSQLLOCALDB' option as shown below. Click 'OK' to save this option and try to import the standard forest description again.
